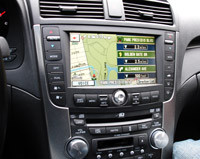
GPS
Dr. Zubairul Islam
Office location Block 105,
Room – 36
Adigrat university
Telephone 0967490505
Email zubairul@gmail.com
This course provides an in-depth overview of the Global Positioning System and covers the growth of the GPS concept. Included in the course is a description of the NAVSTAR constellation and the various types of augmented GPS systems. Basic GPS components are covered, including satellites, ground stations, antennas and receivers. Emphasis is placed on signals, timing and false signals including spoofing, jamming and cryptographic concepts.
On completing this course, Students will able to:
- Collect GPS data
- Import GPS data in the different GIS environment
- Map with the help GPS data
Course Content
CHAPTER 1 – Overview of GPS
The Global Positioning System (GPS), originally NAVSTAR GPS, is a satellite-based radio navigation system owned by the United States government and operated by the United States Air Force. It is a global navigation satellite system (GNSS) that provides geo-location and time information to a GPS receiver anywhere on or near the Earth where there is an unobstructed line of sight to four or more GPS satellites. Obstacles such as mountains and buildings block the relatively weak GPS signals.
The GPS concept is based on time and the known position of GPS specialized satellites. The satellites carry very stable atomic clocks that are synchronized with one another and with the ground clocks. Any drift from time maintained on the ground is corrected daily. In the same manner, the satellite locations are known with great precision. GPS receivers have clocks as well, but they are less stable and less precise.
Each GPS satellite continuously transmits a radio signal containing the current time and data about its position. Since the speed of radio waves is constant and independent of the satellite speed, the time delay between when the satellite transmits a signal and the receiver receives it is proportional to the distance from the satellite to the receiver. A GPS receiver monitors multiple satellites and solves equations to determine the precise position of the receiver and its deviation from true time. At a minimum, four satellites must be in view of the receiver for it to compute four unknown quantities (three position coordinates and clock deviation from satellite time).
1.2 GPS Satellite Network Structure
The current GPS consists of three major segments. These are as follows:
- The space segment
- A control segment
- User segment
The U.S. Air Force develops, maintains, and operates the space and control segments. GPS satellites broadcast signals from space, and each GPS receiver uses these signals to calculate its three-dimensional location (latitude, longitude, and altitude) and the current time.
1.2.1 Space segment
The space segment of the Global Positioning System currently consists of approximately 30 active and spare NAVSTAR satellites (new satellites are launched periodically, and old ones are decommissioned). “NAVSTAR” stands for “Navigation System with Timing and Ranging.”

A visual example of a 24 satellite GPS constellation in motion with the Earth rotating. Notice how the number of satellites in view from a given point on the Earth’s surface changes with time. The point in this example is in Golden, Colorado, USA (39.7469° N, 105.2108° W).
Each satellite circles the Earth every 12 hours in sidereal time along one of six orbital “planes” at an altitude of 20,200 km (about 12,500 miles). The satellites broadcast signals used by GPS receivers on the ground to measure positions. The satellites are arrayed such that at least four are “in view” everywhere on or near the Earth’s surface at all times, with typically up to eight and potentially 12 “in view” at any given time.
1.2.2 Control segment
The control segment (CS) is composed of:
- A master control station (MCS),
- An alternative master control station,
- Four dedicated ground antennas, and
- Six dedicated monitor stations.
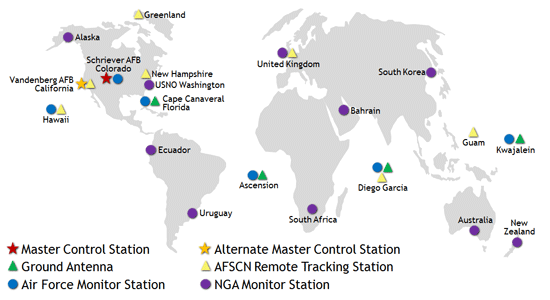
Control Segment
Master Control Station
- Provides command and control of the GPS constellation
- Uses global monitor station data to compute the precise locations of the satellites
- Generates navigation messages for upload to the satellites
- Monitors satellite broadcasts and system integrity to ensure constellation health and accuracy
- Performs satellite maintenance and anomaly resolution, including repositioning satellites to maintain optimal constellation
- Backed up by a fully operational alternate master control station
Monitor Stations
- Track GPS satellites as they pass overhead
- Collect navigation signals, range/carrier measurements, and atmospheric data
- Feed observations to the master control station
- Utilize sophisticated GPS receivers
- Provide global coverage via 16 sites: 6 from the Air Force
Ground Antennas
- Send commands, navigation data uploads, and processor program loads to the satellites
- Collect telemetry
- Communicate via S-band and perform S-band ranging to provide anomaly resolution and early orbit support
- Consist of 4 dedicated GPS ground antennas plus 7 Air Force Satellite Control Network (AFSCN) remote tracking stations
1.2.3 User segment
The user segment (US) is composed of hundreds of thousands of U.S. and allied military users of the secure GPS Precise Positioning Service, and tens of millions of civil, commercial and scientific users of the Standard Positioning Service. In general, GPS receivers are composed of an antenna, tuned to the frequencies transmitted by the satellites, receiver-processors, and a highly stable clock (often a crystal oscillator). They may also include a display for providing location and speed information to the user. A receiver is often described by its number of channels: this signifies how many satellites it can monitor simultaneously.
GPS receivers calculate distances to satellites as a function of the amount of time it takes for satellites’ signals to reach the ground. To make such a calculation, the receiver must be able to tell precisely when the signal was transmitted and when it was received. The satellites are equipped with extremely accurate atomic clocks, so the timing of transmissions is always known. Receivers contain cheaper clocks, which tend to be sources of measurement error. The signals broadcast by satellites, called “pseudo-random codes,” are accompanied by the broadcast ephemeris data that describes the shapes of satellite orbits.
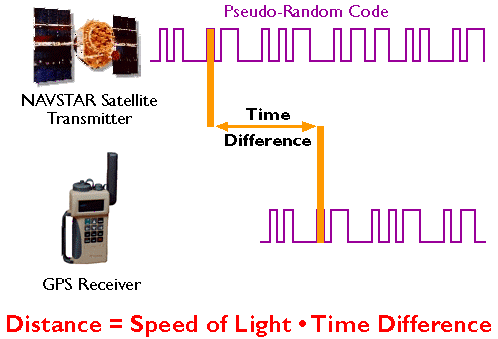
Figure 5.18.1 GPS receivers calculate distance as a function of the difference in time of broadcast and reception of a GPS signal. Distance = Speed of Light * Time Difference.Credit: Adapted from Hurn, 1989
The GPS constellation is configured so that a minimum of four satellites is always “in view” everywhere on Earth. If only one satellite signal was available to a receiver, the set of possible positions would include the entire range sphere surrounding the satellite.

Figure 5.18.2 Set of possible positions of a GPS receiver relative to a single GPS satellite.Credit: Adapted from Hurn, 1993
If two satellites are available, a receiver can tell that its position is somewhere along a circle formed by the intersection of two spherical ranges.
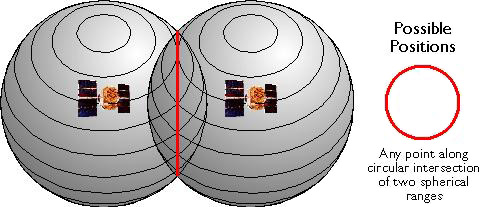
Figure 5.18.3 Set of possible positions of a GPS receiver relative to two GPS satellites.Credit: Adapted from Hurn, 1993
If distances from three satellites are known, the receiver’s position must be one of two points at the intersection of three spherical ranges. GPS receivers are usually smart enough to choose the location nearest to the Earth’s surface. At a minimum, three satellites are required for a two-dimensional (horizontal) fix. Four ranges are needed for a three-dimensional fix (horizontal and vertical).
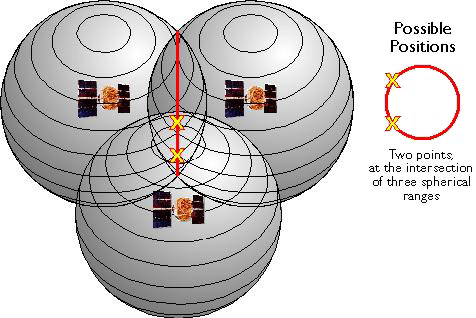
Figure 5.18.4 Set of possible positions of a GPS receiver relative to three GPS satellites.Credit: Adapted from Hurn, 1993
Satellite ranging is similar in concept to the plane surveying method trilateration, by which horizontal positions are calculated as a function of distances from known locations. The GPS satellite constellation is in effect an orbiting control network.
Source:https://www.e-education.psu.edu/natureofgeoinfo/c5_p18.html
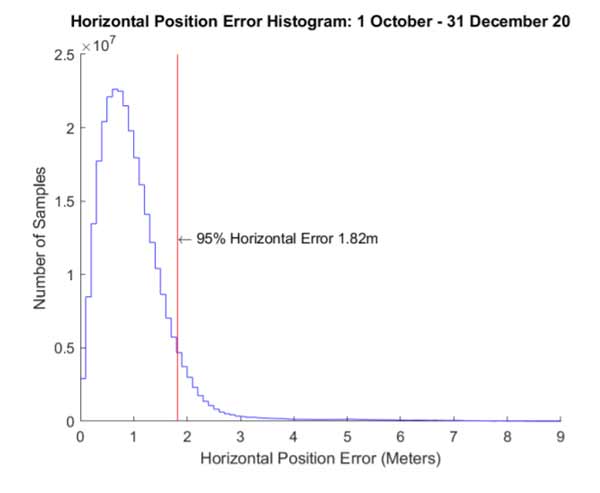
How accurate is GPS?
It depends. GPS satellites broadcast their signals in space with a certain accuracy, but what you receive depends on additional factors, including satellite geometry, signal blockage, atmospheric conditions, and receiver design features/quality.
For example, GPS-enabled smartphones are typically accurate to within a 4.9 m (16 ft.) radius under open sky. However, their accuracy worsens near buildings, bridges, and trees.
High-end users boost GPS accuracy with dual-frequency receivers and/or augmentation systems. These can enable real-time positioning within a few centimeters, and long-term measurements at the millimeter level.
GPS Signal Errors Sources
Factors that can affect GPS signal and accuracy include the following:
- Ionosphere and troposphere delays: Satellite signals slow as they pass through the atmosphere. The GPS system uses a built-in model to partially correct for this type of error.
- Signal multipath: The GPS signal may reflect off objects such as tall buildings or large rock surfaces before it reaches the receiver, which will increase the travel time of the signal and cause errors.
- Receiver clock errors: A receiver’s built-in clock may have slight timing errors because it is less accurate than the atomic clocks on GPS satellites.
- Orbital errors: The satellite’s reported location may not be accurate.
- Number of satellites visible: The more satellites a GPS receiver can “see,” the better the accuracy. When a signal is blocked, you may get position errors or possibly no position reading at all. GPS units typically will not work underwater or underground, but new high-sensitivity receivers are able to track some signals when inside buildings or under tree-cover.
- Satellite geometry/shading: Satellite signals are more effective when satellites are located at wide angles relative to each other, rather than in a line or tight grouping.

- Selective availability: The U.S. Department of Defense once applied Selective Availability (SA) to satellites, making signals less accurate in order to keep ‘enemies’ from using highly accurate GPS signals. The government turned off SA in May of 2000, which improved the accuracy of civilian GPS receivers.
How accurate is GPS for speed measurement?
As with positioning, the speed-accuracy of GPS depends on many factors.
The US government provides the GPS signal in space with a global average user range rate error (URRE) of ≤0.006 m/sec over any 3-second interval, with 95% probability.
This measure must be combined with other factors outside the government’s control, including satellite geometry, signal blockage, atmospheric conditions, and receiver design features/quality, to calculate a particular receiver’s speed accuracy.
How accurate is GPS for timing?
GPS time transfer is a common method for synchronizing clocks and networks to Coordinated Universal Time (UTC). The government distributes UTC as maintained by the U.S. Naval Observatory (USNO) via the GPS signal in space with a time transfer accuracy relative to UTC(USNO) of ≤40 nanoseconds (billionths of a second), 95% of the time. This performance standard assumes the use of a specialized time transfer receiver at a fixed location.
Is military GPS more accurate than civilian GPS?
The user range error (URE) of the GPS signals in space is actually the same for the civilian and military GPS services. However, most of today’s civilian devices use only one GPS frequency, while military receivers use two.
Using two GPS frequencies improves accuracy by correcting signal distortions caused by Earth’s atmosphere. Dual-frequency GPS equipment is commercially available for civilian use, but its cost and size has limited it to professional applications.
With augmentation systems, civilian users can actually receive better GPS accuracy than the military.
Doesn’t the government degrade civilian GPS accuracy?
No. During the 1990s, GPS employed a feature called Selective Availability that intentionally degraded civilian accuracy on a global basis.
In May 2000, at the direction of President Bill Clinton, the U.S. government ended its use of Selective Availability in order to make GPS more responsive to civil and commercial users worldwide.
The United States has no intent to ever use Selective Availability again.
Like the Internet, GPS is an essential element of the global information infrastructure. The free, open, and dependable nature of GPS has led to the development of hundreds of applications affecting every aspect of modern life. GPS technology is now in everything from cell phones and wristwatches to bulldozers, shipping containers, and ATM’s.
MAJOR APPLICATIONS:
-
Agriculture
-
Aviation
-
Environment
-
Public Safety & Disaster Relief
-
Surveying & Mapping
-
Roads & Highways
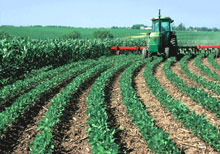
Agriculture
The development and implementation of precision agriculture or site-specific farming has been made possible by combining the Global Positioning System (GPS) and geographic information systems (GIS). These technologies enable the coupling of real-time data collection with accurate position information, leading to the efficient manipulation and analysis of large amounts of geospatial data. GPS-based applications in precision farming are being used for farm planning, field mapping, soil sampling, tractor guidance, crop scouting, variable rate applications, and yield mapping. GPS allows farmers to work during low visibility field conditions such as rain, dust, fog, and darkness.
In the past, it was difficult for farmers to correlate production techniques and crop yields with land variability. This limited their ability to develop the most effective soil/plant treatment strategies that could have enhanced their production. Today, more precise application of pesticides, herbicides, and fertilizers, and better control of the dispersion of those chemicals are possible through precision agriculture, thus reducing expenses, producing a higher yield, and creating a more environmentally friendly farm.

Precision agriculture is now changing the way farmers and agribusinesses view the land from which they reap their profits. Precision agriculture is about collecting timely geospatial information on soil-plant-animal requirements and prescribing and applying site-specific treatments to increase agricultural production and protect the environment. Where farmers may have once treated their fields uniformly, they are now seeing benefits from micromanaging their fields. Precision agriculture is gaining in popularity largely due to the introduction of high technology tools into the agricultural community that are more accurate, cost effective, and user friendly. Many of the new innovations rely on the integration of on-board computers, data collection sensors, and GPS time and position reference systems.
Many believe that the benefits of precision agriculture can only be realized on large farms with huge capital investments and experience with information technologies. Such is not the case. There are inexpensive and easy-to-use methods and techniques that can be developed for use by all farmers. Through the use of GPS, GIS, and remote sensing, information needed for improving land and water use can be collected. Farmers can achieve additional benefits by combining better utilization of fertilizers and other soil amendments, determining the economic threshold for treating pest and weed infestations, and protecting the natural resources for future use.
GPS equipment manufacturers have developed several tools to help farmers and agribusinesses become more productive and efficient in their precision farming activities. Today, many farmers use GPS-derived products to enhance operations in their farming businesses. Location information is collected by GPS receivers for mapping field boundaries, roads, irrigation systems, and problem areas in crops such as weeds or disease. The accuracy of GPS allows farmers to create farm maps with precise acreage for field areas, road locations and distances between points of interest. GPS allows farmers to accurately navigate to specific locations in the field, year after year, to collect soil samples or monitor crop conditions.
Crop advisors use rugged data collection devices with GPS for accurate positioning to map pest, insect, and weed infestations in the field. Pest problem areas in crops can be pinpointed and mapped for future management decisions and input recommendations. The same field data can also be used by aircraft sprayers, enabling accurate swathing of fields without use of human “flaggers” to guide them. Crop dusters equipped with GPS are able to fly accurate swaths over the field, applying chemicals only where needed, minimizing chemical drift, reducing the amount of chemicals needed, thereby benefiting the environment. GPS also allows pilots to provide farmers with accurate maps.
Farmers and agriculture service providers can expect even further improvements as GPS continues to modernize. In addition to the current civilian service provided by GPS, the United States is committed to implementing a second and a third civil signal on GPS satellites. The first satellite with the second civilian signal was launched in 2005. The new signals will enhance both the quality and efficiency of agricultural operations in the future.
Benefits
- Precision soil sampling, data collection, and data analysis, enable localized variation of chemical applications and planting density to suit specific areas of the field.
- Accurate field navigation minimizes redundant applications and skipped areas, and enables maximum ground coverage in the shortest possible time.
- Ability to work through low visibility field conditions such as rain, dust, fog and darkness increases productivity.
- Accurately monitored yield data enables future site-specific field preparation.
- Elimination of the need for human “flaggers” increases spray efficiency and minimizes over-spray.
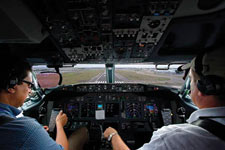
Aviation
Aviators throughout the world use the Global Positioning System (GPS) to increase the safety and efficiency of flight. With its accurate, continuous, and global capabilities, GPS offers seamless satellite navigation services that satisfy many of the requirements for aviation users. Space-based position and navigation enables three-dimensional position determination for all phases of flight from departure, en route, and arrival, to airport surface navigation.
The trend toward an Area Navigation concept means a greater role for GPS. Area Navigation allows aircraft to fly user-preferred routes from waypoint to waypoint, where waypoints do not depend on ground infrastructure. Procedures have been expanded to use GPS and augmented services for all phases of flight. This has been especially true in areas that lack suitable ground based navigation aids or surveillance equipment.
New and more efficient air routes made possible by GPS are continuing to expand. Vast savings in time and money are being realized. In many cases, aircraft flying over data-sparse areas such as oceans have been able to safely reduce their separation between one another, allowing more aircraft to fly more favorable and efficient routes, saving time, fuel, and increasing cargo revenue.
Improved approaches to airports, which significantly increase operational benefits and safety, are now being implemented even at remote locations where traditional ground-based services are unavailable. In some regions of the world, satellite signals are augmented, or improved for special aviation applications, such as landing planes during poor visibility conditions. In those cases, even greater precision operations are possible.
The good news for the aviation community is that GPS is being constantly improved and modernized. A main component of the ongoing civilian modernization effort is the addition of two new signals. These signals complement the existing civilian service. The first of these new signals is for general use in non-safety critical applications. The second new signal will be internationally protected for aviation navigational purposes. This additional safety-of-life civilian signal will make GPS an even more robust navigation service for many aviation applications.

The second safety-of-life signal will enable significant benefits above and beyond the capabilities of the current GPS services. The availability of this signal offers increased instrument approach opportunity throughout the world by making the use of dual-frequency avionics possible. Dual frequency means that errors that occur in the signals due to disturbances in the ionosphere can be significantly reduced through the simultaneous use of two signals. This will improve the overall system robustness, to include accuracy, availability, and integrity, and will allow a precise approach capability with little or no ground infrastructure investment.
Reliance on GPS as the foundation for today and tomorrow’s air traffic management system is a major part of many national plans. Those aviation authorities that are moving forward with GPS have observed and documented reductions in flight time, workload, and operating costs for both the airspace user and service provider. GPS also serves as an essential component for many other aviation systems, such as the Enhanced Ground Proximity Warning System (EGPWS) that has proven successful in reducing the risk of Controlled Flight into Terrain, a major cause of many aircraft accidents.
Benefits
- Continuous, reliable, and accurate positioning information for all phases of flight on a global basis, freely available to all.
- Safe, flexible, and fuel-efficient routes for airspace service providers and airspace users.
- Potential decommissioning and reduction of expensive ground based navigation facilities, systems, and services.
- Increased safety for surface movement operations made possible by situational awareness.
- Reduced aircraft delays due to increased capacity made possible through reduced separation minimums and more efficient air traffic management, particularly during inclement weather.
- Increased safety-of-life capabilities such as EGPWS.
Environment
To sustain the Earth’s environment while balancing human needs requires better decision making with more up-to-date information. Gathering accurate and timely information has been one of the greatest challenges facing both government and private organizations that must make these decisions. The Global Positioning System (GPS) helps to address that need.
Data collection systems provide decision makers with descriptive information and accurate positional data about items that are spread across many kilometers of terrain. By connecting position information with other types of data, it is possible to analyze many environmental problems from a new perspective. Position data collected through GPS can be imported into geographic information system (GIS) software, allowing spatial aspects to be analyzed with other information to create a far more complete understanding of a particular situation than might be possible through conventional means.
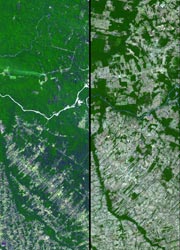
Before and after imagery of Amazon deforestation
Aerial studies of some of the world’s most impenetrable wilderness are conducted with the aid of GPS technology to evaluate an area’s wildlife, terrain, and human infrastructure. By tagging imagery with GPS coordinates it is possible to evaluate conservation efforts and assist in strategy planning.
Some nations collect and use mapping information to manage their regulatory programs such as the control of royalties from mining operations, delineation of borders, and the management of logging in their forests.
GPS technology supports efforts to understand and forecast changes in the environment. By integrating GPS measurements into operational methods used by meteorologists, the atmosphere’s water content can be determined, improving the accuracy of weather forecasts. In addition, the proliferation of GPS tidal tracking sites, and improvement in estimating the vertical component of a site’s position from GPS measurements, present a unique opportunity to directly observe the effects of ocean tides.
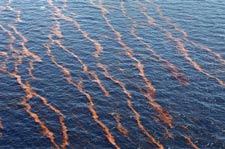
In 2010, GPS helped cleanup crews respond to the massive oil leak in the Gulf of Mexico.
GPS receivers mounted on buoys track the movement and spread of oil spills. Helicopters use GPS to map the perimeter of forest fires and allow efficient use of fire fighting resources.
The migratory patterns of endangered species, such as the mountain gorillas of Rwanda, are tracked and mapped using GPS, helping to preserve and enhance declining populations.
In earthquake prone areas such as the Pacific Rim, GPS is playing an increasingly prominent role in helping scientists to anticipate earthquakes. Using the precise position information provided by GPS, scientists can study how strain builds up slowly over time in an attempt to characterize, and in the future perhaps anticipate, earthquakes.

Endangered monk seal with GPS-enabled tracking device
Another benefit to using GPS is timeliness with which critical products can be generated. Because GPS data are in a digital form available at all times and in all parts of the world, they can be captured and analyzed very quickly. This means that it is possible for analysis to be completed in hours or days rather than weeks or months, thus ensuring that the final product is timelier. With the rapid pace of change in the world today, these savings in time can be critical.
The modernization of GPS will further enhance the support of GPS technology to the study and management of the world’s environment. The United States is committed to implementing two additional civilian signals that will provide ecological and conservation applications with increased accuracy, availability, and reliability. Tropical rain forest ecology, for example, will benefit from the increased availability of GPS within heavy foliage areas and the reduction of spatial error in fine-scale vegetation mapping.
Benefits
- GPS data collection systems complemented with GIS packages provide a means for comprehensive analysis of environmental concerns.
- Environmental patterns and trends can be efficiently recognized with GPS/GIS data collection systems, and thematic maps can be easily created.
- GPS data can be quickly analyzed without the preliminary requirement for field data transcription into a digitized form.
- Accurate tracking of environmental disasters such as fires and oil spills can be conducted more efficiently.
- Precise positional data from GPS can assist scientists in crustal and seismic monitoring.
- Monitoring and preservation of endangered species can be facilitated through GPS tracking and mapping.
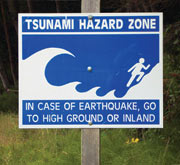
Public Safety & Disaster Relief
critical component of any successful rescue operation is time. Knowing the precise location of landmarks, streets, buildings, emergency service resources, and disaster relief sites reduces that time — and saves lives. This information is critical to disaster relief teams and public safety personnel in order to protect life and reduce property loss. The Global Positioning System (GPS) serves as a facilitating technology in addressing these needs.
GPS has played a vital role in relief efforts for global disasters such as the tsunami that struck in the Indian Ocean region in 2004, Hurricanes Katrina and Rita that wreaked havoc in the Gulf of Mexico in 2005, and the Pakistan-India earthquake in 2005. Search and rescue teams used GPS, geographic information system (GIS), and remote sensing technology to create maps of the disaster areas for rescue and aid operations, as well as to assess damage.
Another important area of disaster relief is in the management of wildfires. To contain and manage forest fires, aircraft combine GPS with infrared scanners to identify fire boundaries and “hot spots.” Within minutes, fire maps are transmitted to a portable field computer at the firefighters’ camp. Armed with this information, firefighters have a greater chance of winning the battle against the blaze.
In earthquake prone areas such as the Pacific Rim, GPS is playing an increasingly prominent role in helping scientists to anticipate earthquakes. Using the precise position information provided by GPS, scientists can study how strain builds up slowly over time in an attempt to characterize, and in the future perhaps anticipate, earthquakes.
Meteorologists responsible for storm tracking and flood prediction also rely on GPS. They can assess water vapor content by analyzing transmissions of GPS data through the atmosphere.
GPS has become an integral part of modern emergency response systems — whether helping stranded motorists find assistance or guiding emergency vehicles.

As the international industry positioning standard for use by emergency and other specialty vehicle fleets, GPS has given managers a quantum leap forward in efficient operation of their emergency response teams. The ability to effectively identify and view the location of police, fire, rescue, and individual vehicles or boats, and how their location relates to an entire network of transportation systems in a geographic area, has resulted in a whole new way of doing business. Location information provided by GPS, coupled with automation, reduces delay in the dispatch of emergency services.
Incorporation of GPS in mobile phones places an emergency location capability in the hands of everyday users. Today’s widespread placement of GPS location systems in passenger cars provides another leap in developing a comprehensive safety net. Today, many ground and maritime vehicles are equipped with autonomous crash sensors and GPS. This information, when coupled with automatic communication systems, enables a call for help even when occupants are unable to do so.
The modernization of GPS will further facilitate disaster relief and public safety services. The addition of new civil signals will increase accuracy and reliability all over the world. In short, GPS modernization translates to more lives saved and faster recovery for victims of global tragedies.
Benefits
- Deliver disaster relief to areas in a more timely and accurate manner, saving lives and restoring critical infrastructure.
- Provide position information for mapping of disaster regions where little or no mapping information is available.
- Enhance capability for flood prediction and monitoring of seismic precursors and events.
- Provide positional information about individuals with mobile phones and in vehicles in case of emergency.
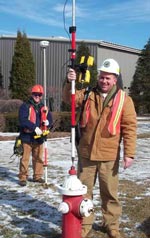
Surveying & Mapping
The surveying and mapping community was one of the first to take advantage of GPS because it dramatically increased productivity and resulted in more accurate and reliable data. Today, GPS is a vital part of surveying and mapping activities around the world.
When used by skilled professionals, GPS provides surveying and mapping data of the highest accuracy. GPS-based data collection is much faster than conventional surveying and mapping techniques, reducing the amount of equipment and labor required. A single surveyor can now accomplish in one day what once took an entire team weeks to do.
GPS supports the accurate mapping and modeling of the physical world — from mountains and rivers to streets and buildings to utility lines and other resources. Features measured with GPS can be displayed on maps and in geographic information systems (GIS) that store, manipulate, and display geographically referenced data.
Governments, scientific organizations, and commercial operations throughout the world use GPS and GIS technology to facilitate timely decisions and wise use of resources. Any organization or agency that requires accurate location information about its assets can benefit from the efficiency and productivity provided by GPS positioning.
Unlike conventional techniques, GPS surveying is not bound by constraints such as line-of-sight visibility between survey stations. The stations can be deployed at greater distances from each other and can operate anywhere with a good view of the sky, rather than being confined to remote hilltops as previously required.
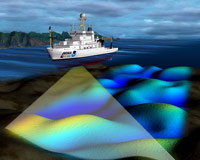
GPS is especially useful in surveying coasts and waterways, where there are few land-based reference points. Survey vessels combine GPS positions with sonar depth soundings to make the nautical charts that alert mariners to changing water depths and underwater hazards. Bridge builders and offshore oil rigs also depend on GPS for accurate hydrographic surveys.
Land surveyors and mappers can carry GPS systems in backpacks or mount them on vehicles to allow rapid, accurate data collection. Some of these systems communicate wirelessly with reference receivers to deliver continuous, real-time, centimeter-level accuracy and unprecedented productivity gains.

To achieve the highest level of accuracy, most survey-grade receivers use two GPS radio frequencies: L1 and L2. Currently, there is no fully functional civilian signal at L2, so these receivers leverage a military L2 signal using “codeless” techniques.
The ongoing GPS modernization program is adding a dedicated civil signal at L2 that supports high-accuracy positioning without the use of military signals. The GPS program is also adding a third civil signal at the L5 frequency that will enhance performance even further. After 2020, the government will no longer support codeless access to military GPS signals.
Benefits
- Significant productivity gains in terms of time, equipment, and labor required
- Fewer operational limitations compared to conventional techniques.
- Accurate positioning of physical features that can be used in maps and models.
- Faster delivery of geographic information needed by decision makers.
- Centimeter-level surveying results in real-time.
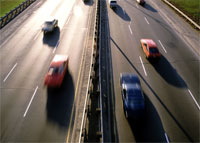
Roads & Highways
It is estimated that delays from congestion on highways, streets, and transit systems throughout the world result in productivity losses in the hundreds of billions of dollars annually. Other negative effects of congestion include property damage, personal injuries, increased air pollution, and inefficient fuel consumption.
The availability and accuracy of the Global Positioning System (GPS) offers increased efficiencies and safety for vehicles using highways, streets, and mass transit systems. Many of the problems associated with the routing and dispatch of commercial vehicles is significantly reduced or eliminated with the help of GPS. This is also true for the management of mass transit systems, road maintenance crews, and emergency vehicles.
GPS enables automatic vehicle location and in-vehicle navigation systems that are widely used throughout the world today. By combining GPS position technology with systems that can display geographic information or with systems that can automatically transmit data to display screens or computers, a new dimension in surface transportation is realized.
A geographic information system (GIS) stores, analyzes, and displays geographically referenced information provided in large part by GPS. Today GIS is used to monitor vehicle location, making possible effective strategies that can keep transit vehicles on schedule and inform passengers of precise arrival times. Mass transit systems use this capability to track rail, bus, and other services to improve on-time performance.
Many new capabilities are made possible with the help of GPS. Instant car pools are feasible since people desiring a ride can be instantly matched with a vehicle in a nearby area.
Using GPS technology to help track and forecast the movement of freight has made a logistical revolution, including an application known as time-definite delivery. In time-definite delivery, trucking companies use GPS for tracking to guarantee delivery and pickup at the time promised, whether over short distances or across time zones. When an order comes in, a dispatcher punches a computer function, and a list of trucks appears on the screen, displaying a full array of detailed information on the status of each of them. If a truck is running late or strays off route, an alert is sent to the dispatcher.
Many nations use GPS to help survey their road and highway networks, by identifying the location of features on, near, or adjacent to the road networks. These include service stations, maintenance and emergency services and supplies, entry and exit ramps, damage to the road system, etc. The information serves as an input to the GIS data gathering process. This database of knowledge helps transportation agencies to reduce maintenance and service costs and enhances the safety of drivers using the roads.
Research is underway to provide warnings to drivers of potential critical situations, such as traffic violations or crashes. Additional research is being conducted to examine the potential for minimal vehicle control when there is a clear need for action, such as the pre-deployment of air bags. The position information provided by GPS is an integral part of this research.
GPS is an essential element in the future of Intelligent Transportation Systems (ITS). ITS encompasses a broad range of communications-based information and electronics technologies. Research is being conducted in the area of advanced driver assistance systems, which include road departure and lane change collision avoidance systems. These systems need to estimate the position of a vehicle relative to lane and road edge with an accuracy of 10 centimeters.
With the continuous modernization of GPS, one can expect even more effective systems for crash prevention, distress alerts and position notification, electronic mapping, and in-vehicle navigation with audible instructions.
Benefits
- Higher levels of safety and mobility for all surface transportation system users.
- More accurate position determination to provide greater passenger information
- More effective monitoring to ensure schedule adherence, creating a transit system more responsive to transportation users needs.
- Better location information with electronic maps to provide in-vehicle navigation systems for both commercial and private users.
- Increased efficiencies and reduced costs in surveying roads.
CHAPTER 2 – Garmin GPS and functions

SWITCH THE GPS ON AND OFF
- Switch the device on by pressing the power key on top of it.
- To switch the device off, press and hold the power key until the display clears. When you switch the device off, previously recorded data will be preserved.
INITIALISING
Take the device outside where it has a clear view of the sky and switch it on.
The GPS automatically looks for satellite signals (Acquiring Satellites message). This should take a couple of minutes at most. The bottom of the screen displays the signal strength for each satellite.
Watch the satellite symbol on top of the display:
 Empty – signals are too weak to determine your location
- 2D – signals are sufficient to determine X/Y coordinates
- 3D – signals are sufficient to determine X/Y coordinates and altitude
Once the GPS finds sufficient satellite signals to determine your location, your current coordinates appear at the top of the screen. The coordinates are displayed in BNG coordinates (British National Grid) or another coordinate system, depending on the device settings.
Switch the GPS device on. It displays the Satellite Page.
Press the Page key multiple times to cycle through various display pages:

When you switch to a page, its title is displayed on top of the screen for a couple of seconds. Then the title is replaced by the battery and satellite symbols, allowing you a quick view at the most essential information.
We will refer to these pages later in the guide. For now, press the Page key until you come back to the initial Satellite Page.
If you find it hard to read the pages, adjust the display settings: Press the Power key, this shows the display settings. Use the Rocker key to adjust brightness (up/down) and contrast (left/right). Usually both should be set to a medium value.
CHECK AND CHANGE BATTERIES
- Check the battery status on the top left of the screen. A brindled battery symbol indicates full batteries; a hollow symbol indicates empty batteries. Full batteries should last for about a day of continuous operation, but battery life depends on how you use the GPS device. To be on the safe side, always take spares with you.
- When you remove the batteries, stored data will be preserved.
- The GPS 60 operates on two M batteries. Alkaline (disposable) or NiMH (rechargable) batteries may be used, but do not mix Alkaline and NiMH batteries.
- When replacing batteries, use only new or fully charged batteries.
- Use rechargeable batteries if possible. These do not last as long as disposable batteries but are less harmful to the environment.
To change batteries:
- Switch the device off by pressing and holding the power key until the display clears.
- On the back of the device, lift the D-ring, turn it 1/4 turn counter clockwise, and then pull the battery cover away.
- Remove the old batteries.
- Insert the new batteries, observing the proper polarity as indicated inside the battery compartment.
- Reinstall the battery cover by connecting the bottom of the cover to the bottom of the device. Make sure the tab on the cover fits into the slot on the device. Press the cover closed and turn the D-ring clockwise to lock.
- Recycle empty batteries. There are battery recycling containers all over campus.
CLEAR OLD DATA
The previous user might have left data on the device. To delete old data follow this procedure:
- Press the Page key until the Trip Computer page is displayed.
- Press the MENU key.
- With Reset… selected, press the ENTR key.
- Use the Rocker key to highlight Select All.
- Press the ENTR key.
- Use the Rocker key to highlight Apply.
- Press the ENTR key.
- To confirm, use the Rocker key to highlight OK.
- Press the ENTR key.
- The device deletes the old track data and returns to the Trip Computer page.
- Pressing the Page key, flip through the pages until you come back to the Satellite Page.
Select > Settings > System.
- Auto Lock
-
Allows you to lock the touchscreen automatically to prevent accidental touches. Use the During Activity option to lock the touchscreen during a timed activity. Use the Watch Mode option to lock the touchscreen when you are not recording a timed activity.
- Language
-
Sets the language displayed on the device.
- Time
-
Adjusts the time settings (Time Settings).
Time Format
Sets the device to show time in a 12-hour or 24-hour format.
Time Source
Sets the time source for the device. The Auto option sets the time automatically based on your GPS position. The Manual option allows you to adjust the time. - Backlight
-
Adjusts the backlight settings (Backlight Settings).
Mode
Sets the backlight to turn on for interactions. Interactions include the keys, touchscreen, and notifications.Gesture
Sets the backlight to turn on for wrist gestures. Gestures include rotating your wrist toward your body to view the device. You can use the Only During Activity option to use gestures only during timed activities.Timeout
Sets the length of time before the backlight turns off.Brightness
Sets the brightness level of the backlight. - Vibration
-
Sets the device vibration level. The toggle switch allows you to turn vibrations on or off.
- Do Not Disturb
-
Turns on or off do not disturb mode.
- Controls Settings
-
Allows you to add, reorder, and remove the shortcut menu options in the controls menu.
- Units
-
Sets the units of measure used on the device (Changing the Units of Measure).
You can customize units of measure for distance, pace and speed, elevation, weight, height, and temperature.
Select Menu button > Settings > System > Units.
Select a measurement type.
Select a unit of measure. - USB Mode
-
Sets the device to use mass storage mode or Garmin® mode when connected to a computer.
- Restore Defaults
-
Allows you to reset user data and settings (Restoring All Default Settings).
NOTE: This deletes all user-entered information and activity history.
You can reset all settings back to the factory default values.
2.4 COLLECTING DATA IN THE FIELD
The GPS device lets you collect
- Tracks, these are recorded automatically as you move
- Waypoints, these are points of interest that you record manually, e.g. soil sample locations
In addition to these recording functions, the GPS 60 can be used for routing (directing you to predefined places or along predefined routes). Routing functions are not covered here, for more information on routing see the GPS60 manual.
RECORDING A TRACK LOG
Whenever the GPS device is powered up and has a sufficient satellite signal, it automatically and continuously records a track log.
- Switch the GPS device on and make sure it receives a good enough signal (Satellites page).
- Press the Page key to flip through the pages until you come to the Map page.
- Walk around for a couple of minutes. As you move, the GPS device automatically and continuously records a series of points along the way and displays them on the Map page as in Figure 3. This series of points is called a Track Log.

Figure 3: Track recording - Use the IN and OUT keys to zoom the display and the Rocker key to centre it.
The GPS device will record your track log until you switch it off. After switching it on again, it will continue recording.
SAVING A TRACK
Save the contents of the track log in a Track file:
- After you finished a track, go to the Main Menu page.
- With Tracks selected, press the ENTR key.
- Use the Rocker key to highlight Save and press the ENTR key.
- When asked if you want to save the entire track, highlight Yes and press the ENTR key.
- By default the track is named by the current date. Enter your own name for your track: use the Rocker key to highlight the Name field and press ENTR. A keypad is displayed. Use the Rocker key to highlight characters, pressing ENTR after every character. When you have entered the track name, highlight OK and press ENTR.
- Leave all other settings for the track as they are, navigate to OK and press the ENTR key. This copies the current track log to a track file with the name you just set.
- Press the QUIT key to return to the Main Menu page.
This procedure copies the current track log to a file. It does not clear the log, so future recordings will still be appended to the current log.
If you want to start a new track log, you need to clear the track log first:
- Go to the Main Menu page.
- With Tracks selected, press the ENTR key.
- Use the Rocker key to highlight Clear and press the ENTR key.
- When asked if you really want to delete the log, highlight Yes and press the ENTR key.
This procedure only clears the log. It does not delete the saved track files.
RECORDING WAYPOINTS
While the track log is great way of recording where you were, in many cases you want to record specific points rather than a whole track. These can be soil sample locations, landmarks, etc. These points are called Waypoints. Waypoints need to be recorded manually.
To mark a waypoint at your current location:
- Go to the Map page.
- Press the MARK key. The Mark Waypointpage appears (Figure 4).

Figure 4: Mark a waypoint - Use the Rocker key to highlight the Name field and press the ENTR key.
- By default the waypoints are named with consecutive numbers. Write down the waypoint number, e.g. 001, along with other data you are collecting at this location, e.g. a location name and sample values.
- Leave all other settings for the waypoint as they are. Navigate to OK and press the ENTR key to save the waypoint. The display reverts to the Map page, displaying the waypoint.
MANAGING WAYPOINTS
You can edit your waypoints, view them on the map or have the GPS direct you to a previously recorded waypoint.
- Press the FIND key.
- With Waypoints selected, press the ENTR key.
- A list of previously recorded waypoints is displayed (Figure 5).

Figure 5: Waypoint list Highlight one of them and press ENTR.
- To edit a waypoint, use the Rocker key to flip through the fields. In the field you want to edit, press ENTR and change it as described above, e.g. add a note to the waypoint.
- To delete a waypoint, highlight Delete and press ENTR.
- To show a waypoint on the Map page, highlight Map and press ENTR
- To have the GPS route you to the waypoint, highlight Go To and press ENTR.
NB: Waypoints are stored separately from tracks. Therefore when you download or delete a track, the waypoints along that track will not be downloaded/deleted automatically.
FINISHING
You can switch the device off and on again during or after recording data. The data you recorded will be preserved.
CHAPTER 3 – Importing Global Positioning Systems (GPS) data in Google Earth
-
Absolutely no programming skills needed!
-
In April 2017, Google Earth on Web was released, which puts Earth on the browser. However, for this tutorial, you will need Earth Pro for Desktop installed on your computer. Download the latest version here. (It’s free!)
-
Open Google Earth.
-
If you have data stored on your Garmin or Magellan handheld GPS device, connect your device to your computer using your USB or Serial port connector, and turn on the device. This will be the data you use for the next section.
-
You will also want some GPS data with which to experiment later in the tutorial. Download the sample dataset by right-clicking and saving the file GPS_track_Save-the-Elephants.gpx to your computer. These data have been shared by Save the Elephants, and are for use for this tutorial.
3.3. Import GPS data from your handheld GPS device
-
Make sure that your Garmin or Magellan handheld GPS device is connected to your computer using your USB or Serial port connector, and that your GPS device is turned on.
Note: If you are using a USB connection, you may need to first install a driver for your GPS device. Drivers can be found on the CD that came with your device, or downloaded from the device manufacturer’s web site.
-
Go to the Tools menu and select GPS.
-
In the GPS Import window, go to the Import tab and choose your device: Garmin or Magellan.
-
Check the boxes if you want to import Waypoints, Tracks, and/or Routes.
-
Click Import. Your data will be downloaded from your device directly into Google Earth, where you can view and save it as described below.
-
For this tutorial you can import and use the GPS_track_Save-the-Elephants.gpx file you downloaded earlier. Help with importing GPS data from a file can be found below.
-
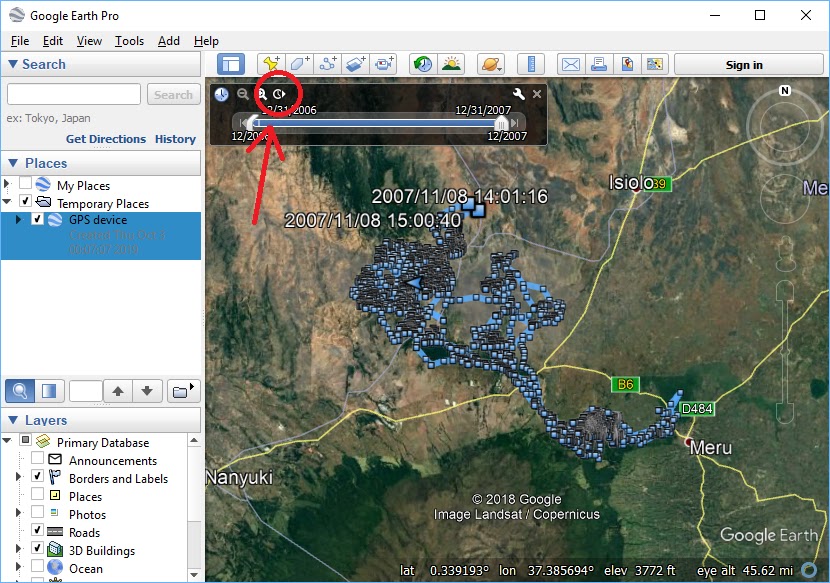
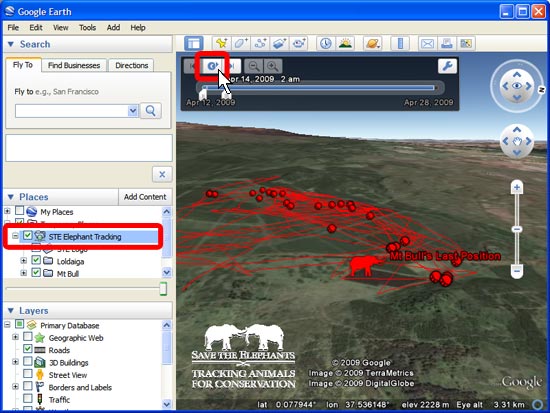
Data imported from a GPS handheld device can be animated because it has time stamps (date and time) of when it was collected by the GPS device. Simply select the GPS data in the Places panel, and click Play on the Time Controls.
-
Save your GPS data to a KML file by right-clicking on your GPS data folder in the Places panel, and selecting Save Place As… or select the GPS device data in the Places panel, go to the File menu, and select Save Place As…


Tips
- You can also get data from your GPS device in real time. For example, if you go out in the field with your laptop, you can view your current location live on Google Earth. From the GPS Import dialog box, select the _ Real Time_ tab to see options for viewing live data. You’ll need to make sure that your GPS device is connected and streaming data using one of the supported protocols (NMEA is the most common).
- Before you disconnect your laptop from the internet and go out in the field, be sure to use Google Earth to fly to and view the places you’ll be visiting so that the relevant imagery is saved in the cache on your hard drive.
3.4 Import GPS data from a file
If you have GPS data stored in a GPX or other type of file, you can open it in Google Earth. Also, if you have a GPS device for which Google Earth does not support direct connections, but which can export data to a file, you can still view your GPS data in Google Earth. Read the instructions that came with your GPS device for exporting data from your device to a file on your computer. You can also use third-party software like GPS Babel to download the GPX file to your computer.
-
If you do not have your own file to use (supported file formats are .gpx, .loc, and .mps), you can download and use this sample file provided by Save the Elephants, by right-clicking and saving the file GPS_track_Save-the-Elephants.gpx
-
Go to the File menu, select Open…
-
In the Open window, change the filetype to the GPS file types by using the Files of type list and selecting Gps (.gpx, .loc, *.mps).
-
Navigate to the appropriate location on your computer and select the GPS file.
-
Click the Open button to begin the import process.
-
In the GPS Data Import dialog box that appears, choose to Create KML Tracks. Also, choose to Create KML LineStrings, and to Adjust altitudes to ground height.
-
Click OK. The file is imported and can be viewed and saved as KML in Google Earth as described below.
-
Once you’ve loaded your GPS data into Google Earth, you can edit the waypoint placemarks and track paths, and add more information about the waypoints and tracks in the balloons.


3.5 View and save your GPS data
-
Once you have loaded your GPS data into Google Earth, you can edit the waypoint placemarks and track paths, and add more information about the waypoints and tracks in the balloons. To edit a feature in Google Earth, right-click on the feature in the 3D viewer or the Places panel, and choose Properties (on a PC) or Get Info (on a Mac).
-
Data imported from a GPS handheld device can be animated because it has time stamps (date and time) of when it was collected by the GPS device. Simply select (highlight) the folder of GPS data in the Places panel, and click Play on the Time Controls.
-
To save your GPS data to a KML file on your hard drive, right-click (Ctrl-click on a Mac) on your GPS data folder in the Places panel, and select Save Place As.
The image below shows a final product of Save the Elephants’ GPS track of an elephant they monitor.
CHAPTER 4 -ODK Collect
Open Data Kit (ODK) is a suite of open source tools that help organizations collect and manage data.
The core ODK tools are:
ODK Collect, an Android app that replaces paper-based forms.
ODK Aggregate, a proven server for data storage and analysis tool.
ODK Central, a modern server with a RESTful API.
ODK Build, a drag-and-drop form designer.
ODK XLSForm, an Excel-based form designer.
ODK Briefcase, a desktop tool that pulls and exports data from Aggregate and Collect.
Install & Configure ODK Collect
Install & Configure ODK Collect
-
Go to the Google Play Store and search for ODK Collect. If you already have ODK Collect installed, update it so you have the newest version.
-
Open the ODK Collect app
-
Click on the Menu (three dots in the upper right corner)
-
Click on General Settings
-
Under Server Settings, click on Platform so you can change the destination path for where your ODK Collect data will be sent.
-
Select “Google Drive, Google Sheets”
-
Next, click on Google Account and choose the account you wish to use with ODK Collect. This account will be where you store your forms on Google Drive and where your spreadsheet with all your and others’ ODK data submissions will live. (Do not enter anything in the “Google Sheets URL” field.)
-
TIP: The Android device needs to be connected to a Google Account with editing rights to the form you created. Add a Google Account to your Android phone.
-
Hit the back button to return to the main menu.
Create Your Form for Data Collection & Submissions
What is an XLSForm?
XLSForm is a form standard created to help simplify the authoring of forms in Excel. Authoring is done in a human readable format using a familiar tool that almost everyone knows – Excel. XLSForms provide a practical standard for sharing and collaborating on authoring forms. They are simple to get started with but allow for the authoring of complex forms by someone familiar with the syntax described below.
The XLSForm is then converted to an ODK XForm, a popular open form standard, that allows you to author a form with complex functionality like skip logic in a consistent way across a number of web and mobile data collection platforms.
Basic format
Each Excel workbook usually has two worksheets: survey and choices. A third optional worksheet called settings can add additional specifications to your form and is described below.
The survey worksheet
This worksheet gives your form its overall structure and contains most of the content of the form. It contains the full list of questions and information about how they should appear in the form. Each row usually represents one question; however, there are certain other features described below that you can add to the form to improve the user experience.
The choices worksheet
This worksheet is used to specify the answer choices for multiple choice questions. Each row represents an answer choice. Answer choices with the same list name are considered part of a related set of choices and will appear together for a question. This also allows a set of choices to be reused for multiple questions (for example, yes/no questions).
Both of these worksheets have a set of mandatory columns that must be present for the form to work. Additionally, each worksheet has a set of optional columns that allow further control over the behavior of each entry in the form, but are not essential to have. Every entry must have values for each of the mandatory columns, but the optional columns may be left blank.
- The survey worksheet has 3 mandatory columns: type, name, and label.
- The type column specifies the type of entry you are adding.
- The name column specifies the unique variable name for that entry. No two entries can have the same name. Names have to start with a letter or an underscore. Names can only contain letters, digits, hyphens, underscores, and periods. Names are case-sensitive.
- The label column contains the actual text you see in the form. Alternatively, label translation columns can be used.
| type | name | label |
|---|---|---|
| today | today | |
| select_one gender | gender | Respondent’s gender? |
| integer | age | Respondent’s age? |
| surveychoicessettings | ||
- The choices worksheet has 3 mandatory columns as well: list name, name, and label.
- The list name column lets you group together a set of related answer choices, i.e., answer choices that should appear together under a question.
- The name column specifies the unique variable name for that answer choice.
- The label column shows the answer choice exactly as you want it to appear on the form. Alternatively, label translation columns can be used.
| list_name | name | label |
|---|---|---|
| gender | transgender | Transgender |
| gender | female | Female |
| gender | male | Male |
| gender | other | Other |
| surveychoicessettings | ||
The columns you add to your Excel workbook, whether they are mandatory or optional, may appear in any order. Optional columns may be left out completely. Any number of rows may be left blank. All .xls file formatting is ignored, so you can use dividing lines, shading, and other font formatting to make the form more readable.
One thing to keep in mind when authoring forms in Excel is that the syntax you use must be precise. For example, if you write Choices or choice instead of choices, the form won’t work.
Question types
XLSForm supports a number of question types. These are just some of the options you can enter in the type column in the survey worksheet in your XLSForm:
| Question type | Answer input |
|---|---|
| integer | Integer (i.e., whole number) input. |
| decimal | Decimal input. |
| range | Range input (including rating) |
| text | Free text response. |
| select_one [options] | Multiple choice question; only one answer can be selected. |
| select_multiple [options] | Multiple choice question; multiple answers can be selected. |
| select_one_from_file [file] | Multiple choice from file; only one answer can be selected. |
| select_multiple_from_file [file] | Multiple choice from file; multiple answers can be selected. |
| rank [options] | Rank question; order a list. |
| note | Display a note on the screen, takes no input. |
| geopoint | Collect a single GPS coordinate. |
| geotrace | Record a line of two or more GPS coordinates. |
| geoshape | Record a polygon of multiple GPS coordinates; the last point is the same as the first point. |
| date | Date input. |
| time | Time input. |
| dateTime | Accepts a date and a time input. |
| image | Take a picture or upload an image file. |
| audio | Take an audio recording or upload an audio file. |
| video | Take a video recording or upload a video file. |
| file | Generic file input (txt, pdf, xls, xlsx, doc, docx, rtf, zip) |
| barcode | Scan a barcode, requires the barcode scanner app to be installed. |
| calculate | Perform a calculation; see the Calculation section below. |
| acknowledge | Acknowledge prompt that sets value to “OK” if selected. |
| hidden | A field with no associated UI element |
| xml-external | Adds a reference to an external XML data file |
GPS
For example, to collect the name and GPS coordinates of a store, you would write the following:
| type | name | label |
|---|---|---|
| text | store_name | What is the name of this store? |
| geopoint | store_gps | Collect the GPS coordinates of this store. |
| surveychoicessettings | ||
See the question_types XLSForm for a look at each question type being used in a form.
GPS with accuracyThreshold
When recording GPS coordinates in ODK Collect, ODK collect automatically collects the gps when an accuracy level of 5 meters or less is reached. You can change this default behaviour by specifying an accuracyThreshold; this could be less than 5m or more than 5m. You will need to add a column with heading body::accuracyThreshold on the survey sheet of your XLSForm. Then specify your preferred accuracy threshold value for this column on your geopoint question, as in the example shown below:
| type | name | label | body::accuracyThreshold |
|---|---|---|---|
| geopoint | store_gps | Collect the GPS coordinates of this store. | 1.5 |
| surveychoicessettings | |||
See gps_accuracy_threshold form for an example that uses this attribute.
Multiple choice
XLSForm supports both select_one (select only one answer) and select_multiple (select multiple answers) questions. Writing a multiple choice question requires adding a choices worksheet to your Excel workbook. Here is an example of a select_one question:
| type | name | label |
|---|---|---|
| select_one yes_no | likes_pizza | Do you like pizza? |
| survey choices settings | ||
| list name | name | label |
|---|---|---|
| yes_no | yes | Yes |
| yes_no | no | No |
| surveychoicessettings | ||
Note that the yes_no in the survey worksheet must match the yes_no in the list name column in the choices worksheet. This ensures that the form displays the correct list of answer choices for a particular question.
We can also add multiple choice questions that allow multiple answers to be selected, like so:
| type | name | label |
|---|---|---|
| select_multiple pizza_toppings | favorite_toppings | What are your favorite pizza toppings? |
| surveychoicessettings | ||
| list name | name | label |
|---|---|---|
| pizza_toppings | cheese | Cheese |
| pizza_toppings | pepperoni | Pepperoni |
| pizza_toppings | sausage | Sausage |
| surveychoicessettings | ||
For more information pls visit following link
http://xlsform.org/en/#the-survey-worksheet
Now you will need to host the survey form you built with ODK Build in your Google Drive so that your project team will be able to download it to their Android phones. You’ll also need to create a spreadsheet which will be where completed survey responses from your project team will be sent and stored.
-
Log in to Google Drive with your Google account.
-
Create a Google Drive folder for your ODK project. Select Add new and choose Folder. Give the folder a name you’ll remember.
-
In the ODK project folder, add a new spreadsheet. Select Add new and choose Sheet. This will be the spreadsheet that collects your ODK survey responses.
-
In the new Sheet, click the Share button and set the Sheet to “Anyone with the link can edit”.
-
Copy the Sheet URL.
-
In another browser tab, open your survey form in ODK Build.
-
In ODK Build, go to Edit > Form Properties. Paste the Sheet URL in the submission URL field.
-
In ODK Build, download your form as an XML file. Click File > Export to XML. Then in the pop up window, click Download.
-
Switching back to Google Drive, click New and upload the xml form to your ODK project folder.
-
Click on the XML file in your ODK project folder, then click the Share button. Change the settings to “Anyone with the link” can edit and add any individuals who need to download the form on their Android. For a person to be able to download your form, the form must be shared with their Google account so they see it in their “Shared With Me” Drive files.


Collect Data Using ODK Collect
-
Click “Get Blank Form.” Then click “My Drive.” Click “Allow” to let ODK Collect access your Google Drive account. ODK Collect will search your Google Drive account for XML files, which will display after your list of folders. A good trick is to organize your XML files into a folder so you can find them easily.
-
Searching for forms: It’s faster to search for forms than to browse for forms.
-
Browsing My Drive or Shared With Me: you can browse My Drive or Shared With Me (e.g. if you’ve shared your form with data collectors, this is where they would go to navigate to your form, but search is faster). XML files will display underneath your folder directory.
-
-
Search for the form you just added by entering the form name in the search box. Click the check box on the right side and hit “Download Selected.” You’ll see a window appear saying “Success” once the form completes downloading. Download your sample form that you just created.
-
In the main menu of ODK Collect, click “Fill Blank Form” and proceed to fill out your information. When complete, hit “Send Finalized Form” and your submission will appear in your Google Sheet.
-
The first time you send a submission to your new sheet, your device will ask for permission to submit to Google Drive. Click Allow to send data to your sheet.
-
TIP: If you encounter an error submitting to Sheets, try deleting other forms you’re no longer using. Main Menu > Delete Saved Form.
-
This video shows how to submit ODK Collect data to Google Sheets. (1:53)
-
View Your Data
-
Go to your submission Sheet to view your data. You don’t need to refresh the page to see new data streaming in.
-
If you’ve included a photo in your form, your sheet will include a link to the photo. Photos are sent to each user’s Google Photos Album Archive associated with their Google account in an unlisted album where only users with the link can view. Each photo will be stored in an album with the form name, so you can browse through photos submitted to one form.
-
To visualize your data submissions on a map, you can use Google My Maps. Maps that you create are also stored in your Google Drive account, so all of your ODK data can be hosted, managed and visualized in one Drive Folder. Follow step-by-step instructions to import info into Google Maps, or visit the Visualize Your Data on a Custom Map using My Maps tutorial. You can either download your data as a CSV file or import directly from Google Sheets.
Congratulations — you are now using Google Drive to store and manage your ODK Collect data!
CHAPTER 5 – Using GPS data in ArcGIS Online web maps
GPS data, whether waypoints, tracks, or routes, can be easily added to your ArcGIS Online web maps. Here’s a closer look at how you can use GPS data, plus some tips on getting more information out of your GPS locations.
Adding GPS tracks, waypoints, and routes
Once you have collected tracks, waypoints, or routes using your GPS device, you can add them to your ArcGIS Online web map. First, export the data from your device as a GPX file – the GPS Exchange format. How you create the GPX file will depend upon the GPS device and software you use.
In this example we’re using a Garmin device and the bundled Garmin MapSource software. But no matter what device you are using, the procedure will be similar.
First, connect your GPS device to your computer, and using your GPS software transfer the data from the device:

In this example we’ve collected a track and waypoints hiking, and can view it in the GPS software as shown below:

Under our Save as options, we select GPS eXchange Format as the file type, to save our hike as a GPX file.

Adding a GPX file to a web map
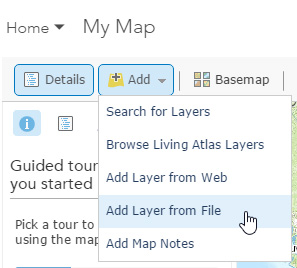
To add the GPX file to a web map, choose Add, then Add Layer from File:
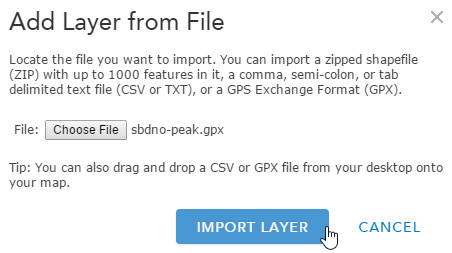
Then browse to the location of your GPX file to select it, then click Import Layer:
Displaying your GPX file
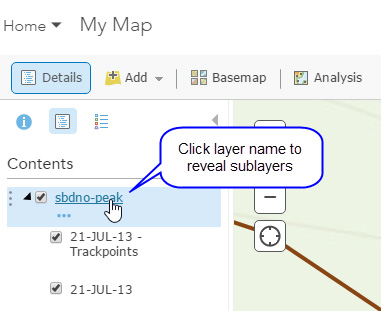
Once imported, your GPX will display on the map. But depending on what you captured using your GPS device and exported to the GPX file, you may have sublayers you can toggle on.
For example, we captured both the track and waypoints using our GPS device, and exported both in the GPX file. By default, only the track was visible after imported. To display other sublayers, click the layer name to reveal them, and check those you want to display:
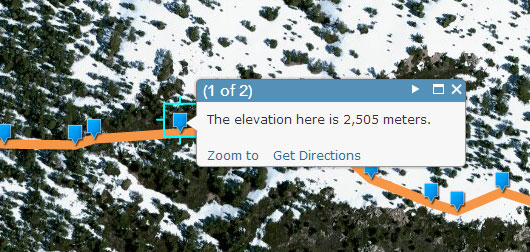
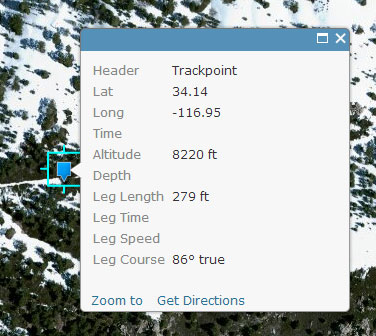
You can change symbols, adjust transparency, configure the pop-up, and more, just like other layers. Below we’ve changed symbols and configured the pop-up:
Tip: Getting more out of your GPS data
The GPX file contains more information than what is available after importing it, for example the lat/long of the waypoint and other attributes. How do you get at this information?
One way is to export the GPS data as a comma-separated value (CSV) file instead of a GPX file. This provides access to all information stored by your GPS device, and you can add the CSV file directly to your map by choosing Add, then Add Layer from File.
Using our Garmin MapSource application, we discovered that when saved as a CSV the latitude and longitude values were stored in a single field. This required additional edits to separate them into unique fields, easily accomplished using a text editor, before we could add the CSV to our map.
Following this workflow and options, you can effectively display and make use of your GPS data.
For more information see